Launch FluentMigrator from within Visual Studio
10 Dec 2012When it comes to creating database migrations for your .net application, then FluentMigrator is simply one of the best options around. It has an API that’s very easy to discover and has support for lots of different database systems (SQL Server, sqlite, postgres, …). As a result, re-creating a development database or migrating your production database is only a matter of executing the migrations. Easy.
However, when you’re creating new migrations, it often happens that you
- run your migrations
- check the result, see that you want change some minor things
- rollback the migration
- change your code
- run the migration again
- rollback the migration, e.g. to test your down operation
- …
As you can see, you want to run the up and down parts of your migration several times. This article will describe how to define an external tool in Visual Studio to quickly migrate and rollback the migrations you are working on. Thanks go out to Frederick D’hont for giving me the initial idea.
Setting up your migrations project
First we are going to modify our project in such a way that setting up our external tool will become easier. This involves 4 steps:
-
First, we install the Fluent Migrator Tools nuget package inside our Migrations projeect. This will download and extract a
Migrate.exeexecutable. This executable can be useed to execute your migrations from the command line, exactly what we need -
Add the
Migrate.exeand theFluentMigrator.Runner.dllassemblies to your project by right-clicking on the project and selecting Add an existing item. Navigate to thepackagesfolder of your solution and pick theMigrate.exeand theFluentMigrator.Runner.dllthat are somewhere inside the FluentMigrator.Tools folder. Make sure you select Add as link and pick theAnyCPUversion.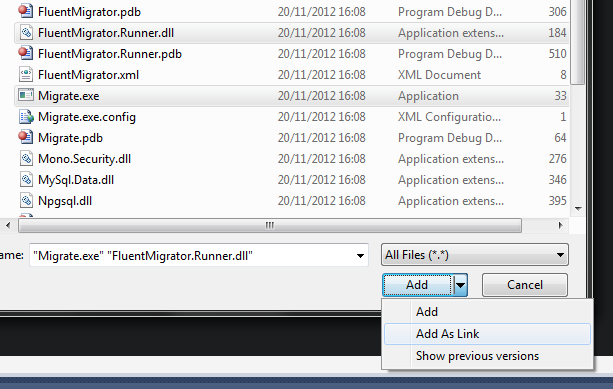
Alternatively, you can manually download or compile the exe and dll from source and add them to your source control.
Note: In some cases, you might have already added the
FluentMigrator.Runner.dllassembly as an actual assembly reference, because it contains some functionality you need. In that case, you don’t need to add it again. -
Open up the properties for the
Migrate.exeandFluentMigrator.Runner.dllitems in your Visual Studio project, and set it to Copy to output directory: Copy always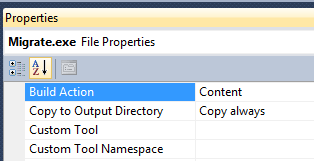
-
Add the connection string for your development machine to the
app.configof the migrations assembly. As the name simply use your machine name. By doing so, FluentMigrator can automatically select the connection string for your machine. Also it allows your team members to put their connection string in theapp.configfile.
Once these steps are performed, the output directory of your project will now contain the migrations assembly as well as an executable that can run them.
Defining the external tool
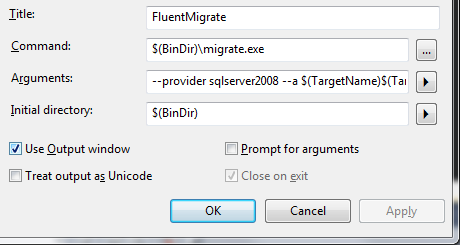
Our project is now in the perfect shape to make an external tool consume it. Open up the external tools manager and create a new tool. Give it the following values.
- Title: FluentMigrate
- Command:
$(BinDir)\Migrate.exe - Arguments:
--provider sqlserver2008 --a $(TargetName)$(TargetExt) - Initial Directory:
$(BinDir) -
Use output window: click checkbox
You will probably receive a warning that the “Command is not a valid executable”. This
is caused by the $(BinDir) variable that is used in the Command property, but don’t
worry, this is not a problem. Simply click “No”, indicating that you want to apply your
changes.
That’s it, if you now build your migrations project and launch the external tool it will
run the current state. Additionally, you can define a second External Tool that executes
a rollback. The settings for such a rollback tool are the same as above, except that
FluentMigrator needs 1 extra parameer in the arguments: --task=rollback
Runnig the external tool, and re-using it
Now that we have setup our tool, it can be run from any node in the solution explorer that is related to the migrations project. Also if your open file is a migration, you can launch the external tool.
It’s also important to note that as long as migration projects are set up in the way that we described above, the external tool can be re-used. So if you have multiple solutions that each have their migrations project, you can use the external tool. tool can be re-used.
Bonus points: keyboard shortcuts
To further increase your productivity, you can assign keyboard shortcuts to each of them. Peresonally I use:
Ctrl-K, M: for executing the pending migrations.Ctrl-K, R: for rolling back a migration.
There you go, running database migrations on your development database is as easy a issuing a keyboard shortcut or navigating to a menu item.